
Published: 21st May 2012 | © Anthias Consulting Ltd
The installation of a capillary column into a gas chromatograph requires precise positioning of the column into both the inlet and the detector to obtain optimum analytical performance. Individual manufacturers, even different detector or inlet types or inlet liners, have different requirements for the optimum insertion length and positioning of the column, which should be checked from the relevant instrument operating manual. Here we look at installation using physical markers for column positioning.
Using a septum to mark the correct insertion distance
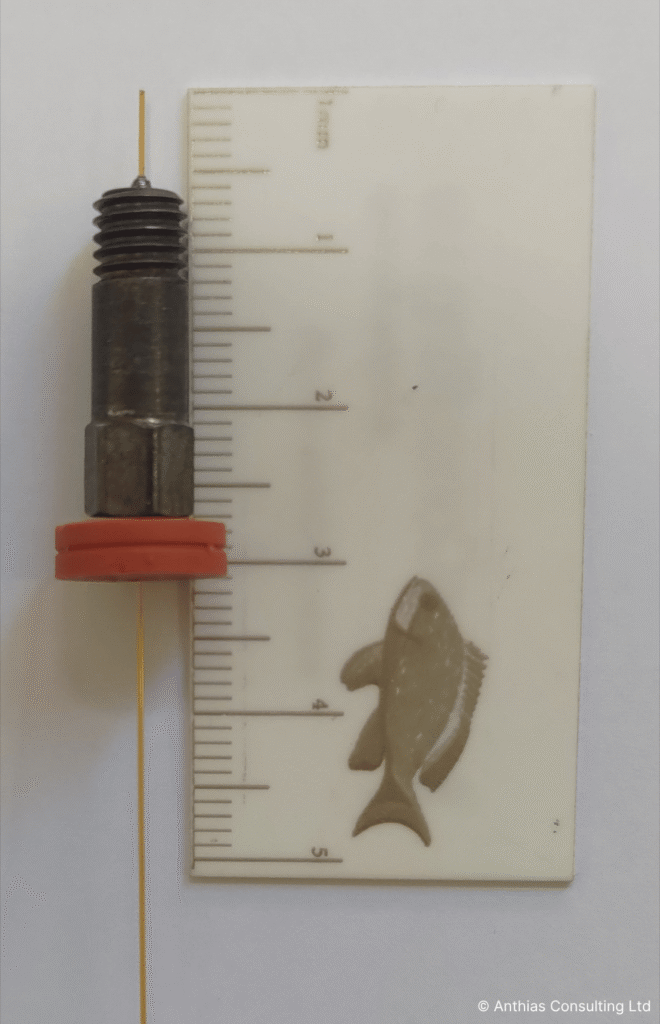
With the end of the column pointing vertically upwards a used septum is slid onto the capillary column, followed by the column nut and the ferrule (ensure they are both the correct orientation). After all the components have been assembled, a short length of column, around 0.5-1 cm, is trimmed off to remove the possibility of blockage or adsorption in the end of the column from septum and ferrule particles.
The position of the septum is adjusted so that when the nut is resting on top of the septum (Figure 1), the correct length of column protrudes through the ferrule for insertion into the inlet or detector*. The column is then held under the septum and inserted into the inlet or detector, the column nut tightened to finger tight and depending on the manufacturer’s instructions and the ferrule material a wrench may be used, for example for an extra ¼ of a turn.
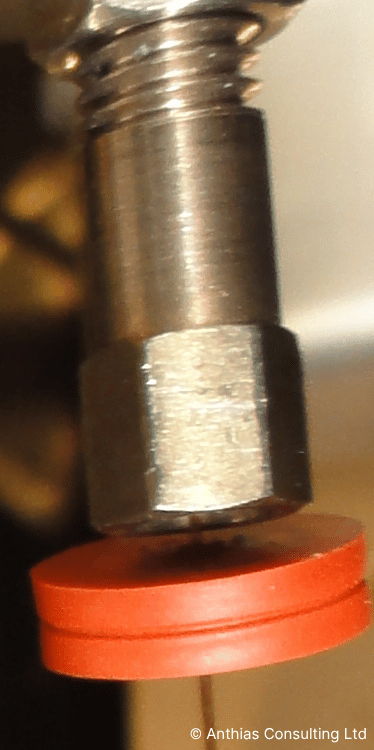
It is essential to hold the septum firmly against the bottom of the capillary nut whilst tightening it to keep the correct distance, as the column can freely slide through the ferrule until tightened (Figure 2). After tightening and physical column installation completed, the carrier gas should be turned on and the column conditioned according to the column manufacturer’s instructions. The septum type should be chosen so that it can tolerate the upper limit of the oven temperature programme and may then be left in place after installation quite safely.
* Some manufacturers specify the length of column as the distance measured from the back of the column nut.
Using fingers to mark the correct insertion distance
The disadvantages of using a septum to help install the column the correct distance into the inlet or detector include the septum drying out and therefore being very difficult to move when column trimming. Even if the septum doesn’t stick, there will always be some residue left on the outside of the column, so that when the column is moved upwards and trimmed, that residue is now near the top of the column and can be desorbed within the inlet producing additional, contamination peaks, the same occurs if you use any adhesive for marking the position.
Following the same procedure as when using a septum, fingers only (no septum) can be used to hold the nut and ferrule in the correct position when installing the column. Hands should be clean (or gloves worn), the nut sits on top of the first finger and thumb of the non-dominant hand, the column protrusion length adjusted and then the finger and thumb don’t move until column installation is complete. The dominant hand is used to guide the column for installation, tightening of the nut and use of the wrench.
Final checks
Whichever method is used, on tightening of the nut, the ferrule then grips the column and this should be checked with a gentle downwards pull of the column. If worried that the column has moved, the column can be removed, the protrusion length checked and adjusted if necessary, then re-installed – but this will be easier than with a new ferrule, as it will now be gripping the column.
Note: An approach often used, is to mark the correct insertion distance on the capillary column using typing correction fluid. The disadvantage of this approach is that as the fluid dries in the oven, fine white particles may flake off and contaminate the instrument. This could be a serious problem if used on the transfer line of a GC-MS for instance, where the particles could be drawn into the ion source. For this reason we would not recommend the use of correction fluid for the installation of capillary columns, using clean fingers only, is the best method – it just takes practice!
To learn more about GC columns, attend:
- Practical Essentials of GC columns, detector and mass spectrometers, day 2 and Practical Essentials of GC columns, module four of our Complete GC and GC-MS
- Hands-on GC theory and methods , day one of our Hands-on GC and GC-MS
- Comprehensive GC hardware (Agilent GC)
- Comprehensive GC hardware (Shimadzu GC)
- Comprehensive GC hardware (Thermo GC)
- Comprehensive GC hardware (Scion/Bruker/Varian GC)
To learn how to trim a column and install a column attend:
- Absolute Basics of GC and GC-MS – learn to trim only
- Applied GC and GC-MS maintenance, module elven of our Complete GC and GC-MS
- Hands-on GC maintenance, day two of our Hands-on GC and GC-MS
Don’t forget that you can also subscribe to our newsletters and receive useful tips straight to your inbox!


